
Modernity Magma
- The Grand Architect

- Dec 8, 2025
- 8 min read
Updated: Jan 8
TUTORIAL
*the last two steps of this tutorial are under review*
Ever wondered how the Modernity by KDT™ magma texture was made? This guide breaks down the full creation process for a stylized pāhoehoe lava flow, perfect for Minecraft. Learn how to build a unique texture from scratch, with no pre-made assets!
MATERIAL RATING: Low-Level Advanced
Estimated Completion Time: 1.5 hr
BEFORE WE BEGIN...
A Word Of Encouragement
Hey there, I know the material rating may seem daunting, but don't let it discourage you. When I created this texture, I was very new to Photoshop, using available tutorials and much experimentation. You can do this! Take a breath, and take your time. Nothing worth having in life comes easy, but by taking the time to learn to harness the full power of this program, you will come out a better artist and designer for it, just as I did. If you're looking for a quick info-grab, this isn't it. But if you truly want to better yourself, you've come to the right place.
Once you have completed this tutorial, I highly encourage you to make it your own. Do it over again. Add more steps! See if you can remove steps and refine the process, just as I have. Look at real-life examples to further blur the line between art and reality. And when you're done—show it off in our Discord! I am eager to see what you can create!

NON-DESTRUCTIVE WORKFLOW
Work Smarter, Not Harder
What sets this tutorial apart is that we are going to make changes without destroying our previous work. This will keep your document uncluttered with hundreds of backup images, and help you develop good habits that any artist—or employer—will want to see.
NOTE: Not everyone learns the same way. If you have trouble following text, simply look at the accompanying visuals and video guide below. Explanation for blue text can be found below each section for more information.
Prepare Your Albedo : The Real Rock Texture

1. Go outside and take a close up, well lit picture of a rock.
2. In Photoshop, create a new document and set the pixel size to. 1024 by 1024. You do not need to worry about the PPI [Pixels Per Inch].
3. Import the image into Photoshop by clicking & dragging it directly from your file explorer.
4. Select and right-click the image in the Layer's panel. In the pop-up menu, select the "Reset Transforms" option. This will set your image back to it's original size.
5. Select your rock image and go to Filter > Blur > Gaussian Blur. Set the radius to 1.0 pixels. This will apply as a Smart Filter. This is a crucial step to avoid the grain overpowering the final texture.
6. Move the image around the canvas to find the most suitable section of your rock for texturing. Use the Rectangular Marquee Tool or [M] to select that section.
7. With the selection active, click Add Layer Mask (the white rectangle with a circle inside) at the very bottom under the Layers Panel.
8. Next, Convert this layer into a Smart Object by right-clicking it in the Layers Panel and selecting "Convert to Smart Object." Now, duplicate this layer by pressing [CTRL + J] on your keyboard.
NOW LET'S MAKE IT SEAMLESS
9. With your duplicated top layer selected, go to the top menu and select:
Filter > Other > Offset. In the pop-up window, set the Horizontal and Vertical pixel counts to 512. Set the edges to "Wrap around."
10. Add a Layer Mask to your duplicated rock layer. Select a soft brush and and set the color to black. Paint over the seams to erase them. Change the brush color to white to undo a mistake or press [CTRL + Z] on your keyboard.
CONGRADULATIONS, YOU MADE A SEAMLESS ROCK TEXTURE!
BLUE NOTES
STEP 2: A single Minecraft default block texture is 16 by 16 pixels. We are starting at 1024 by 1024 pixels to get the highest quality texture. Ideally, you should start at 2048x, but the point is that it is easier to take away pixel data, than it is to add it. Always create at the highest pixel count you plan to release your pack in before going down.
STEP 3: The drag and drop directly from your file explorer is the correct and NON-destructive way to import your file. This is because photoshop will automatically convert your image into a smart object, preserving it's quality as long as the image stays at [or below] it's original size even though visually scaled down.
STEP 6: Smart Objects are the key to non-destructive workflow. It allows you to apply filters [like Gaussian Blur] and make alterations that you can edit or remove later.
1 / 5 Completed
Prepare Your Albedo : The Artificial Rock Texture

1. Make a new layer and then set your foreground and background colors to black and white (the default).
2. Go to the Channels tab next to the Layers tab. You should see RGB, Red, Blue, Green, and your layer's filter mask.
3. Add a new channel by clicking the "Create New Channel" icon. This channel will say Alpha 1 by default and appear black.
4. Turn off visibility for all channels that are not Alpha 1 simply by left-clicking the Alpha 1 channel. Then, in the top bar, go to:
Filter > Render > Difference Clouds. Apply this effect 2 more times (for a total of 3).
5. Select the RGB channel to reactivate the normal RGB channels and hide the Alpha 1 channel. Then go back to the Layers tab and select your regular "Clouds" Smart Object layer.
6. In the top bar, go to:
Filter > Render > Lighting Effects.
7. Under the top bar menu items to the left, you should see a section with a drop-down menu called "Presets". Click it and in the pop-up menu options, select Parallel Direction.
8. Your clouds layer will turn a different color (likely blue). In the right-hand properties panel, set that color to black.
9. Set the Intensity to 100, Exposure to -50. A little farther down, in the Texture drop-down menu, select your Alpha 1 channel.
10. Play with the Height slider until you find a value that you like. I typically like anywhere between 7-15 depending on the block. Once that is done, select "Okay".
CONGRADULATIONS!YOU MADE AN ARTIFICIAL ROCK TEXTURE!
BLUE NOTES
STEP 6: Truthfully, you can achieve the next phase of this texture by using just the artificial texture or the realistic texture. The reason I use both together is because I find that, when combined, they create the most believable basalt texture for our magma rock base. This is technically a stylistic choice, but if you want to learn the Modernity way, then this method will give you the most bang for your artistic buck.
If you would like to watch a guide on how to create the basalt texture with either artificial or realistic texture separately, visit the KAIH.DOESTHINGS YouTube channel for more tutorials, tips, and tricks.
2 / 5 Completed
The Magma Base : The Basalt Texture
1. Add an Adjustment Layer (the half filled circle at the bottom of the layers panel to the right of the Layer Mask option, the white square with the circle, remember?). Select Black & White to desaturate our seamless rock texture.
2. Add another Adjustment Layer, and select Levels. Reduce the brightness and enrich the blacks.
3. In the top bar select:
Filter > Blur > Gaussian Blur, and set the blur level to 1.0.
4. Create a new layer above your rock texture. Fill it with a mid-tone gray color (R:36, B:36, G:36).
5. Change the Blending Mode of the gray layer to Multiply or Darker Color.

CONGRADULATIONS, YOU MADE BASALT!
BLUE NOTES
STEP 2: For this step, play with the left, middle, and right sliders to get the look you want. For this texture, you need your blacks to be as rich as possible, your mid-tones (grays) to be just barely white, and your brightest natural whites to blend in with your barely white grays.
3 / 5 Completed
The Bottom Layer : The Lava Texture [under review by content team]

1. Create a new layer and place it under your base basalt layer.
2. In your foreground and background selectors, choose two colors for your lava (typically red and yellow)
3. Select the new empty layer you just made and in the top bar select:
Filter > Render > Clouds.
4. Create a new levels or curves adjustment layer above your clouds layer. Play with the levels to make the bright spots "hot", but don't blow out your mid-tones.
THE "PROCESSED CHEESE" EFFECT
(e.g., The Plastic-Wrap Effect)
5. Convert the clouds layer into a Smart Object. The go:
Filter > Filter Gallery > Plastic Wrap. You can adjust this filter later by double-clicking it.
CONGRADULATIONS, YOU MADE LAVA!
BLUE NOTES
THE PROCESSED CHEESE EFFECT: Typically, online tutorials will end this process here. This is a very good effect for stylized text masks, but we will take things a step further by reintroducing our basalt material, and pulling all our techniques together for one comprehensive texture.
HANG IN THERE, THIS IS THE HOME STRETCH!
4 / 5 Completed
The Top Layer : The Modernity Magma Texture [under review by content team]

1. Select your top basalt layer.
2. Click the Add Layer Mask icon at the bottom of the layers panel. A white thumbnail should appear next to this layer.
3. With the layer mask selected, access your brush tool by pressing [B] on your keyboard. Set the brush to a soft, round tip. Set the color to black.
4. Use the brush to "paint away" parts of the top layer. Get creative!
5. This is the most important part: Duplicate your Basalt Smart Object layer. With this duplicated layer selected, go to:
Filter > Liquify. This will apply the effect as a smart filter which you can go back and edit at any time. This way, you can use a layer mask on this liquified layer to blend the distorted rock into the original rock underneath. This process is similar to the one you just used to reveal the hidden lava in the layer beneath the basalt.
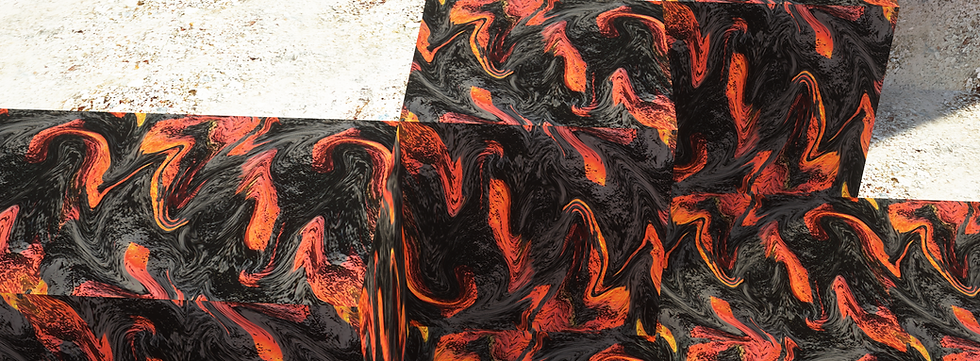
CONGRADULATIONS, YOU MADE MODENITY MAGMA [a.k.a. PĀHOEHOE]!
I am really proud of you for making it this far! I hope you got learned something new and were able to follow along with some of the more technical concepts presented here. Also, I am very to finally share this texture with you. It's one of my favorites.
KEEP CREATING, AND KEEP CRAFTING!
5 / 5 Completed
If you would like to see more texture tutorials, subscribe to the KAIH.DOESTHINGS YouTube channel or join MODERNITY's official Discord.
Comments